April 20th, 2011 • 1 Comment
Update: Please also see this post!
Sometimes I just need to develop some GUIs for testing and demos. For 80% cases I hack those kind of codes in Python so Tkinter is the best choice there. Pretty old school – I know 🙂
I would recommend Qt (using PySide or PyQT) for bigger GUI projects but for interoperability (Tkinter is part of the python download and runs everywhere :-)) issues and development speed I still choose Tkinter most of the time 🙂
What bugged me was the amount of code needed to create a simple GUI. Especially defining the GUI itself in a programming language is a pain – so why no split those things? Defining the GUI in an XML file and just use python to bind some operations behind it…An old blog post here describes this using Tkinter. So a peace of cake (esp. with Tkinter). I made some slight modifications (Support for frames in frames in frames etc.; grid geometry manager instead of pack manager; minor improvements on the XML side etc.) and now you can write a simple XML file like this:
<?xml version="1.0" encoding="UTF-8"?>
<Frame>
    <LabelFrame text='Hello World' borderwidth='2' relief='groove' column='0' row='0' columnspan='2'>
        <Label text='Entry:' column='0' row='0'/>
        <Checkbutton name='check' text='checkbutton' column='1' row='0'/>
        <Entry name='entry' bg='gold' width='30' column='0' row='1' columnspan='2'/>
    </LabelFrame>
    <Button name='ok' text='OK' column='0' row='1'/>
    <Button name='cancel' text='Cancel' column='1' row='1'/>
</Frame>
Write some simple python code so the GUI actually does something:
[...]
xml_ui = TkFromXML()
root = xml_ui.initialize('ui.xml', title = 'Some test gui...')

# config vars for checkboxes etc.
c = xml_ui.checkbox('check')

def ok():
    print xml_ui.entry('entry')
    print c.get()
    root.destroy()

# add button behaviour
xml_ui.button('ok', ok)
xml_ui.button('cancel', root.destroy)

root.mainloop()
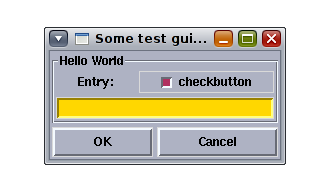
So if ‘OK’ is pressed it will output the text inserted in the Box and the state of the Checkbox. Overall you get something like this:

Simple ain’t it? Comments more than welcome – I tend to release this on GitHub soon!
Categories: Personal, Work • Tags: Python • Permalink for this article
February 21st, 2011 • Comments Off on My Software Development Environment for Python
Python is my favorite programming language for multiple reasons. Most important though is that it has a strong community, a Benevolent Dictator For Life (BDFL) and allows rapid development of high quality software. I love automation of processes wherever possible because it saves time. Here is a list of tools, methodologies, stuff I use to ensure code quality:
- Source Code Management (SCM) – Currently I prefer using Mercurial. It is written in Python and has a low learning curve. Although similar to GIT I don’t think there is much to argue against or in favor of GIT over Mercurial. Most of the time I’m fiddeling around with the command line but for merging I use meld (nice 3-way view) and hgview (it’s faster than the hgk extension) for viewing the current status of the repository.
- Issue Tracking – Since I’m coding in small teams only I find a story board which is located next to the code most convenient. For bigger teams I would favor Mantis.
- Project hosting – Although I’m not a huge fan of Sourceforge it currently offers all I need. Major issue against Sourceforge is the performance of the service. But the ability to deploy website is a must have for me.
- Quality assurance – I use: pylint for code style checks (PEP8 conform of course :-)) (and with a rating with 10 out of 10 :-)), pycoverage for coverage reports (I love to get 100% code coverage with my unittests (Also see this post here) – and yes that’s possible), pygenie to review the complexity, pycallgraph to get an overview of how the code behaves during run-time, and last but no least pep8 for some sanity checks. All these tools are embedded Hudson and reports are generated automatically (!!) without human interaction *yeeha*
- Reporting & Builds – Probably because I have some Sun Microsystems background I like hudson – It runs as a service on my machine in the background and is bound to my local branch of my python code (Polls every 5 minutes). Each time I do a ‘hg commit’ it tests the software and creates a bunch of reports. Nicely integrated are the pylint (via Violations plugins) and the Coverage reporting. So I just have to visit the local hudson page and see what is going on. I could do automatic releases of my code and deploy those on pypi but I don’t because in some months I don’t code that much. (BTW.: I’m not contributing to the Hudson, Jenkins discussion :-))
- Packaging – I use pip to access pypi – Why? Because of the uninstallation and build features it offers. And also the pip requirement files are nice!
- Documentation – I find the sphinx tool very convenient. It comes with nice themes, good code integration and easy to write markup language.
- IDE – I use IDLE for smaller edits, when doing real coding I currently run Aptana Studio Beta 3 – Try it out – it has some nice features (Like the build in Terminal, Python support, Refactoring, Code Formatting, Usable for website development as well etc.).
- Shell script – This is probably not the nicest way but for now the fastest. I have one shell scripts in place which is called by hudson (Main reason why it is a shell script) and which I use to deploy versions of the software to pypi. Whenever I deploy those scripts for example first ensure that all tests run and after a successful deployment they create a tag in the SCM with the version string.
Tools I sometimes use during the development of code:
- tornado web – It is fast, and the asnc calls are nice. The ideal framework to write RESTful service in python.
- django – For bigger Apps I would recommend the Django Framework
- SWIG – To call C libraries from python. I still find it the most convenient way – but I’m happy to be told otherwise
Thinks I would like to have replacements for:
- I would love to see a smartHG instead of smartGIT 🙂
- A mixture of github, bitbucket and SourceForge for project hosting
- Maybe an replacement for hudson…
- the SWIG solution…
Overall I’m pretty happy with this setup and find it good for fast coding. I usually write unittests (With test for success, failure and sanity for every routine) first before starting coding. I don’t find it a time waste but actually I’m pretty sure that the overall setup allows me to code and refactor faster.
Maybe others or you (?) also want to writeup their setups and we can start a site like The Setup for Software Development? Please Retweet and share the link!
Update: Also have a look at this Python and Dtrace blog post.
Categories: Personal, Work • Tags: Python, Software Engineering • Permalink for this article
November 15th, 2010 • Comments Off on OCCI and More
 Busy times – but this post nicely wraps up what is going on regarding OCCI!
Categories: Work • Tags: OCCI • Permalink for this article
September 23rd, 2010 • 3 Comments
Regarding Continuous Integration (CI) systems I probably still like Hudson! Great tool and runs perfectly well. Just get the latest jar file and run it with java – jar hudson.jar. Now to get started you will need to install some plugins:
- the Python plugin
- the mercurial (or whatever SCM you use) plugin
- Violations Plugin (which will parse pylint output later on)
- Cobertura Plugin (which will parse the coverage output and display it nicely)
You can install those plugins in he management interface of hudson. When configuring the job in hudson you simple add a new “Build a free-style software project” job. Add SCM information – and than add some build steps. I had to use two:
python setup.py clean --all
python setup.py build
coverage erase
nosetests --with-coverage --cover-package=<your packages> --with-xunit
coverage xml
And a second one:
#!/bin/bash
pylint -f parseable <your packages> > pylint.txt
echo "pylint complete"
Both are external scripts. Now in the post-build section activate the JUnit test reporting and tell it to use the **/nosetests.xml file. Also activate the Cobertura Coverage report and tell it to use **/coverage.xml. Finally activate the Report Violations – and add pylint.txt in the right row.
Configure the rest of the stuff just as you like and hit the Build button. Thanks to XML the reporting tools written for java can parser the output generated for your Python project. Now you have nice reports from a Python project in Hudson!
![pyssf [Hudson]_1285240971769](http://www.nohuddleoffense.de/wp-content/uploads/2010/09/pyssf-Hudson_1285240971769-300x276.png)
A more detailed and great article about this topic can be found here.
Categories: Work • Tags: Python, Software Engineering • Permalink for this article
September 9th, 2010 • 1 Comment
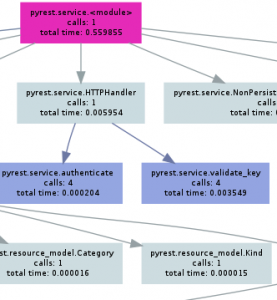
I’m a big fan of reporting be it reports form automated builds, coverages, API documents etc. To evaluate the python code I’m currently working on I needed Call Graph for Python. After some searching and testing I found this package to be most convenient: http://pycallgraph.slowchop.com/

P.S. If you are running Ubuntu (or similar) a sudo apt-get install python-pycallgraph will install the package. To create the graph simple call: pycallgraph –include=<whatever you need> <your app.py>
Categories: Personal, Work • Tags: Python • Permalink for this article
Page 3 of 17«12345...10...»Last »


![pyssf [Hudson]_1285240971769](http://www.nohuddleoffense.de/wp-content/uploads/2010/09/pyssf-Hudson_1285240971769-300x276.png)
