February 28th, 2024 • Comments Off on Your personal AI LLM based agent
Trevor Noah made an interesting comment in one of hit recent podcast:
You know, the new workforce becomes one where your GPT is almost your resume. Your GPT is almost more valuable than you are in a strange way. Do you know what I mean? It’s like a combination of everything you think and everything you’ve thought and the way you synthesize ideas combined with your own personal GPT becomes. And I mean, this is me just like thinking of a crazy future where you go, you literally get to a job and they go, what’s your GPT? And you say, well, here’s mine.
I found this comment intriguing, and based on that I thought, time to go a bit deeper on running AI models locally for privacy reasons; And best way to learn is to build it yourself. So I thought: Can I grab an AI model, add my e.g. CV to it (so it gets to know me), and I can ask it a few questions about me?
Preamble: the following blog post was created using exactly the same methodology as described within it (just instead of a CV it was given a rough draft of the post for the RAG). See notes at the bottom of the post for more information.
User: Can you create a blog post for me with the title: “Building your personal AI LLM based agent.”
Sure, I can help you draft a blog post titled “Building your personal AI LLM based agent” where we discuss optimizing a set of text paragraphs together. Here’s a suggested outline for the blog post:
- Introduction: Discuss the potential future of personalized AI agents and the idea of a “personal GPT” as mentioned in the Trevor Noah and Sam Altman podcast.
- Background: Briefly explain what an LLM (Language Model) is and its relevance to building a personalized AI agent.
- Methodology: Introduce the concept of using RAG (
Rapidly Agile Graphics Retrieval Augmented Generation) and the llama_index package for building a local and relatively private personalized AI assistant.
- Building the chat flow: Walk through the process of setting up the LLM, embedding model, and indexer, and creating a simple for loop chat function.
- Personalizing the assistant: Demonstrate how to add custom prompts and chat history to make the assistant more effective and personalized to the user.
- Conclusion: Recap the benefits and potential future applications of a personalized AI assistant and encourage readers to explore the […]
User: Can you write the introduction for me
In the “What Now?” podcast, Trevor Noah and Sam Altman discussed the potential future of personalized AI agents, where these models would get to know individuals, access their personal data, and work effectively in their context. This concept, as Trevor suggested, could lead to a future workforce where an individual’s GPT (Generative Pre-trained Transformer) becomes their resume or avatar, shaping how others interact with them. To build such a personalized AI agent, we can explore using a local, reasonably private approach, as opposed to relying on big companies for fine-tuning or accessing vast resources. One way to start is by using llama_index, a Python package, to build a simple chat flow for our local AI assistant. This assistant would be able to answer questions related to our expertise and knowledge, providing a more personalized and helpful interaction. The benefits of having a personalized AI agent include privacy, customization, and the ability to work effectively within our unique context. As we continue to explore this project, we’ll dive deeper into the methodology and code required to build and run our very own “personal AI LLM based agent.”
User: Can you write the background section for me
An LLM, or Language Model, is a type of artificial intelligence model that understands and generates human language. In the context of building a personalized AI agent, an LLM can serve as the foundation for understanding and responding to user queries in a more effective and personalized manner. This can be achieved by fine-tuning an LLM on an individual’s data or knowledge base using local models like LlamaCPP and indexing systems like Faiss or Annoy. By doing so, the AI agent becomes an intelligent assistant tailored to the user’s specific needs and preferences. This local approach offers several advantages over relying on large cloud-based models, including privacy, customization, and improved performance within the user’s unique context. For instance, you can create a local AI agent using the Mistral 7B model with LlamaCPP and the UAE-Large-V1 embedding model. First, download the Mistral 7B model for LlamaCPP manually from the Hugging Face model hub and provide it to the helper routine. Next, download the UAE-Large-V1 embedding model if not present/cached locally. Now that we have a model, we can fine-tune the AI agent.
User: Can you write the methodology section for me
Install the required packages for llama_index and Hugging Face Transformers using pip:
pip install llama-index transformers
Obtain a language model (LLM) and embedding model (EmbedModel) by downloading a pre-trained model from Hugging Face Model Hub or your local storage. For example, you can use Mistral-7b model for this purpose. Save the model files in a specific directory.
Create two helper functions to load the LLM and EmbedModel from the saved files:
def get_models(path_to_gguf):
    llm = base.LlamaCPP(
        model_path=path_to_gguf,
        context_window=2048,
        max_new_tokens=256,
        verbose=False
    )

    embedding_model = huggingface.HuggingFaceEmbedding(
        model_name="WhereIsAI/UAE-Large-V1",
        cache_folder="hugging_cache")

    core.Settings.llm = llm
    core.Settings.embed_model = embedding_model

    utils.set_global_tokenizer(
        transformers.AutoTokenizer.from_pretrained("mistralai/Mixtral-8x7B-Instruct-v0.1").encode
    )

    return llm, embedding_model
Initialize the indexer using llama_index by providing the storage directory and data directory. Create a query engine from the indexer:
def get_index(path_to_storage, path_to_data):
    if not os.path.exists(path_to_storage):
        # load the documents and create the index
        documents = readers.SimpleDirectoryReader(path_to_data).load_data()
        index = vector_store.VectorStoreIndex.from_documents(documents, show_progress=True)
        # store it for later
        index.storage_context.persist(persist_dir=path_to_storage)
    else:
        # load the existing index
        storage_context = core.StorageContext.from_defaults(persist_dir=path_to_storage)
        index = indices.load_index_from_storage(storage_context)
    return index
Initialize the chat engine using the query engine, LLM, embedding model, custom prompt, and chat history. Define a maximum number of chat iterations (MAX_CHAT). Create a simple for loop chat function called ‘chat()’ that takes the following steps:
def chat():
    llm, embed_model = get_models("<path to model>/mistral-7b-instruct-v0.2.Q4_K_M.gguf")
    index = get_index("./storage", "./data")

    query_engine = index.as_query_engine()
    ce = chat_engine.CondenseQuestionChatEngine.from_defaults(
        llm=llm,
        query_engine=query_engine,
        condense_question_prompt=custom_prompt,
        chat_history=custom_chat_history,
    )
    for _ in range(MAX_CHAT):
        q = input('\nUser: ')
        if q == 'exit':
            break
        streaming_response = ce.stream_chat(f"<s>;[INST]{q}[/INST]")
        for token in streaming_response.response_gen:
            print(token, end="")
User: Can you write the section on “Personalizing the assistant” for me
Create a custom_prompts.json file containing your desired prompts in JSON format. Update your init_index function to include custom prompts as an argument and use them when creating your index. This will help personalize your local AI agent using LlamaIndex:
custom_prompt = core.PromptTemplate(
    """\
<s><INST>
Given a conversation (between Human and Assistant) and a follow up message from Human, \
rewrite the message to be a standalone question that captures all relevant context \
from the conversation.
<Chat History>
{chat_history}
<Follow Up Message>
{question}
<Standalone question>
</INST></s>
"""
)

custom_chat_history = [
    types.ChatMessage(
        role=types.MessageRole.USER,
        content="Hello assistant, we are having a insightful discussion about Thijs Metsch today. Answer questions in a"
                " positive, helpful and empathetic way.",
    ),
    types.ChatMessage(role=types.MessageRole.ASSISTANT, content="Okay, sounds good."),
]
User: Finally, write the conclusions.
In conclusion, the future of workforce might involve a significant shift towards the integration of personalized AI language model-based agents, as suggested by Trevor Noah and Sam Altman during their podcast conversation. These agents, which could be considered an extension or avatar of an individual, have the potential to revolutionize the way we interact and work by providing context-specific responses and solutions. The process of building such an agent can be initiated using tools like llama_index, which allows for the creation of a simple yet effective chatbot. By combining the user’s expertise and the capabilities of the AI model, a more efficient and personalized assistant can be developed, offering a unique blend of human intelligence and machine learning. As the field of AI continues to evolve, it’s essential to consider the potential benefits and challenges, and to approach the technology with a thoughtful and informed perspective, as outlined in various viewpoints. The code for this blog post, which demonstrates the implementation of a local and relatively private AI language model-based agent, can be found here.
So did it work? It did! Once I indexed my CV I can ask the model that previously knew nothing about me sth:
User: Does Thijs know what an SLO is?
Thijs Metsch has expertise in defining APIs for SLO management […]
Postamble: AI is here to stay I think; in what form & detail we’ll see. LLM are not the solution to everything in the end. I would encourage you to take into consideration different viewpoints, like this one on “What kind of bubble is AI?“. There is more stuff to come; personally, I would love to use Rust instead of python for this kind of work. I’m sure that will come soon.
Some notes on the blog post – especially I wanted to note what all I had to tweak:
- I did find that the Mistral 7B model work really well with a reasonable footprint.
- I did some formatting like adding line breaks etc.
- I did insert hyperlinks to the relevant bits & pieces.
- The code to pull this off is surprisingly fast to write, the libraries are great; you’ll get sth reasonable good in ~100 LOC!
- The results I got weren’t always that great, but a bit of prompt tuning would have fixed that.
- It thought RAG stood for “Rapidly Agile Graphics” not “Retrieval Augmented Generation”.
- I did change out the code snippets with the actually code used; it did add some import statements to the python code which were not necessary (e.g. import faiss).
- It actually came up with good ideas like the addition of pip commands which were not given in the draft post.
- It took a while to generate the first token – subsequent ones are obviously faster.
BTW It has been years, but finally I think I found a reason to add more RAM to my system. Up to now the amount I had was plenty – oh how times change…
Categories: Personal • Tags: Artificial Intelligence, LLM • Permalink for this article
December 12th, 2022 • Comments Off on Intent Driven Orchestration
So let’s start with a bolt statement: the introduction of Microservices/functions and Serverless deployment styles for cloud-native applications has triggered a need to shift the orchestration paradigms towards an intent-driven model.
So what are intents – and what does intent-driven mean? Imagine a restaurant and you order a medium rare steak – the “medium rare” part is the intent declaration. But if we contrast this concept to how orchestration stacks work today – you’d walk into the restaurant, walk straight into the kitchen and you’d say “put the burner on 80% and use that spatula” etc. Essentially declaratively asking for certain amounts of resources/certain way of setup. And obviously, there are a couple of issues with that – you do not necessarily know all the details of the burner. Should it have been set to 80% or 75% maybe? Should it have been 1 core, 500Mb or RAM, sth else? Abstractions and Serverless, anyone?
So why not let app/service owners define what they care about – the objectives of their app/service? For example, “I want P99 latency to be less than 20ms”. That is the “medium rare” intent declaration for an app/service. That is what we’ve been working on here at Intel – and now we’ve released our Intent-Driven Orchestration Planner (Github) for Kubernetes.
Btw.: I shamelessly stole the restaurant metaphor from Kelsey Hightower – for example, check out this podcast. On the P-numbers – again sth that other people have been writing about as well, see Tim Bray‘s blog post on Serverless (part of a Series).
Based on the intents defined by the service owner we want the orchestration stack to handle the rest – just like a good chef. We can do this through scheduling (where/when to place) and planning (how/what to do), to figure out how to set up the stack to make sure the objectives (SLOs) are met.
So why though a planner? The planning component brings sth to the table that the scheduler cannot. It continuously tries to match desired and current objectives of all the workloads. It does this based on data coming from the observability/monitoring stack and tries to reason to enable efficient management. In doing so it can trade-off between various motivations for the stakeholders at play and even take proactive actions if needed – the possibilities for a planner are huge. In the end, the planner can e.g. modify POD specs so the scheduler can make more informed decisions.
Here is an example of that an intent declaration for out Intent Driven Orchestration Planner can look like – essentially requesting that P99 latency should be below 20ms for a target Kubernetes Deployment:
apiVersion: "ido.intel.com/v1alpha1"
kind: Intent
metadata:
  name: my-function-intent
spec:
  targetRef:
    kind: "Deployment"
    name: "default/function-deployment"
  objectives:
    - name: my-function-p99compliance
      value: 20
      measuredBy: default/p99latency
Again the usage of planners is not revolutionary per se, NASA has even flown them to space – and could demonstrate some nice self-healing capabilities – on e.g. Deep Space 1. And just as Deep Space 1 was a tech demonstrator, maybe a quick note: this is all early days for intent-driven orchestration, but we would be very interested in learning what you think…
So ultimately, by better understanding the intents of the apps/services instead of just their desired declarative state, orchestrators – thanks to an intent-driven model – can make decisions that will lead to efficiency gains for service and resource owners.
Categories: Personal • Tags: Cloud, Edge, Intent-Driven Orchestration, Orchestration, Planning • Permalink for this article
May 14th, 2021 • Comments Off on Write your functions in Rust – with Azure & Rocket
Rust is certainly one of the hot programming languages right now. Besides the cool feature set the language offers, companies – like Microsoft, Intel, Google, AWS, Facebook, etc. – embrace it: krustlet, rust-vmm, firecracker, etc. are all written in Rust. Then there is the newly formed Rust foundation and even in a recent survey by Stack Overflow it comes in on top. So why not programming your functions in Rust as well?
Most Cloud providers offer ways to write your function in Rust: AWS has a Rust based runtime for Lambda – using custom AWS Lambda runtimes, Azure offers it through what they call Azure Functions custom handlers. Both are reasonably similar in usage – as basically all you need to do is create an executable that is triggered by the frameworks when an Event arrives. Btw if you want to run it your function on-premises try the Rust template for OpenFaaS. We’ll look into how to integrate with Azure in the following sections.
Similarly to what is described in the Quickstart – it all starts with creating a new package using cargo:
$ cargo new rusty_function
Within the newly created package we need to edit the dependencies. As the function handler will be called through HTTP, a web framework is needed: rocket is one of the major web frameworks in the Rust ecosystem. Secondly serde can be used to serialize and deserialize data. The dependencies section of the Cargo.toml file will hence look something like this:
[dependencies]
rocket = "^0.4.7"
rocket_contrib = "^0.4.7"
serde = "1.0"
serde_derive = "1.0"
serde_json = "1.0"
Writing the actual logic of the function is pretty straight forward – in main() start a web server that listens to a specific port – as provided by an environment variable:
fn main() {
    let port_key = "FUNCTIONS_CUSTOMHANDLER_PORT";
    let port: u16 = match env::var(port_key) {
        Ok(val) => val.parse().expect("Whoops - not a int..."),
        Err(_) => 8080,
    };

    let config = config::Config::build(config::Environment::Staging)
        .address("127.0.0.1")
        .port(port)
        .finalize()
        .unwrap();

    rocket::custom(config)
        .mount("/", routes![index, hello])
        .launch();
}
Notice that two routes are setup in the second to last line of code. The one listening to HTTP GET calls to the main index page, and the actual function that implements our handler. The function for handling the request to the “main page” is not strictly necessary – I did notice however, that the Azure functions framework does make a single HTTP GET call on “/” when the functions starts. Implementing the index function is straight forward hence:
#[get("/")]
fn index() -> &'static str {
    ""
}
Before implementing the logic of the function itself, note that Azure expected the inputs and outputs to be formatted in a certain way – more details can be found here. Let’s focus on the output of the function and make sure it returns a JSON struct similar to this:
{
  "returnvalue": {
    "msg": "hello world"
  },
  "outputs": {
    "res": "ok"
  }
}
Not all of this will actually be returned to the function caller, but some of it is used by the Azure Functions framework itself – like outputs can contain entries you want to put in a Azure Queue storage, and logs (not shown in the example above) can be used to capture logging information. The actual ReturnValue is later on mapped to a response that is send to the function caller – more on that later.
We’ll use a set of structs to defined the JSON – and use the serde crate to enable serialization:
#[derive(Serialize)]
struct Response {
    msg: String,
}

#[derive(Serialize)]
struct OutputBody {
    res: String,
}

#[derive(Serialize)]
struct ResponseMessage {
    returnvalue: Response,
    outputs: OutputBody,
}
Obviously to be more conform with naming conventions in Rust – returnvalue should be called return_value, but Azure is looking for a CamelCase formatted ReturnValue – but luckily allows lower case naming too.
Implementing the actual function is straight forward now – notice the declaration of the /RustFunction route – that is later configured (becoming the name of the function), so the Azure Functions framework knows where to look for the function – more on that in the next steps.
#[post("/RustFunction")]
fn hello() -> json::Json<ResponseMessage> {
    json::Json(ResponseMessage {
        returnvalue: Response{msg: "hello world!".to_string()},
        outputs: OutputBody{res: "ok".to_string()}
    })
}
Make sure you use the nightly toolchain (it’s a rocket requirement atm) using the command rustup override set nightly. Also let’s make sure we get a static linked binary using MUSL by defining the following in the file .cargo/config:
[target.x86_64-unknown-linux-musl]
linker = "rust-lld"
The code will compile now using: cargo build –release –target=x86_64-unknown-linux-musl, and we can run it standalone and even trigger the function if we want to. With a simple curl request the function can be tested locally. For the build command above to work you might need add the musl target to your system using rustup target add x86_64-unknown-linux-musl.
$ curl -X POST localhost:8080/RustFunction
{"returnvalue":{"msg":"hello world"},"outputs":{"res":"ok"}}
Integration with Azure Functions
So far everything has been pretty much generic, to make this function run on Azure some integration steps are required. The files required to do this can be created using the Azure Function Core Tools or probably with some help of your IDE. The command func new can be used to create the right templates. Make sure to configure it using the Custom Handler and HTTP Trigger – name the function e.g. RustyFunction matching the route defined earlier.
In the file host.json we now configure the field defaultExecutablePath to match our binary name – in our case rusty_function. The file RustyFunction/function.json should contain the following:
{
  "bindings": [
    {
      "authLevel": "anonymous",
      "type": "httpTrigger",
      "direction": "in",
      "name": "req",
      "methods": [
        "post"
      ]
    },
    {
      "type": "http",
      "direction": "out",
      "name": "$return"
    }
  ]
}
Notice that within this configuration file we can define the HTTP verbs and also define how Azure Functions should handle the return values – note the $return that basically tells the framework to return whatever is set for the field ReturnValue (see JSON structure earlier) to the caller.
At this point in time, the function can be published to Azure or run locally using func start. Noticed that when calling the function through he framework we just get the “hello world” message back when testing it with curl:
$ curl -X POST http://localhost:7071/api/RustFunction -d ""
{"msg": "hello world"}
Performance
Finally let’s look at the performance of the function when being deployed on Azure. Therefore let’s compare a function written in Python and one written in Rust, both performing the same task: calculating the area of a circle given a radius.
This is not a totally fair comparison – as we are comparing apples to oranges a bit: the programming languages and their stacks are different, their deployment style differs (custom Linux based runtime vs optimized Python runtime). Also note we are only looking at HTTP triggers (coming with an overhead of serialization and deserialization, running a web framework etc.) – none of the other goodies that are available – and obviously hitting a function with a workload generator to look at performance goes a bit against the purpose of function: the frequency of invocation is really “high” and for this kind of call frequency a micro service style deployment might have been way better. Also some aspects of what influences latencies etc. are not in our control – the internet connection, the framework itself, etc.. Anyhow some numbers are better then no numbers.
Both functions have been deployed in Azure West Europe region – the following plot shows the latency percentiles for the function calls. And no surprise, Rust does well (but do notice the tail latency – that could really hurt overall performance – especially if you have multiple of these functions in your environment):
 (Click to enlarge)
Another benefit of writing our function in Rust – the binary is tiny; Just about 5.6M in this case – so you can very easily package it up in a tiny container and run that in Azure, or OpenFaaS or … . Now it would be great to be able us other event triggers and concepts like function orchestration provided by e.g. Durable Functions as well in future.
Categories: Personal • Tags: Cloud, FaaS, Rust, Serverless • Permalink for this article
June 14th, 2020 • Comments Off on AI planning algorithms in Rust
Artificial Intelligence (AI) is a hot topic, although it seams that the focus is on Neural Networks & Deep Learning on the software/algorithmic side, while GPUs/TPUs are the #1 topic for hardware. While this is fine, it feels sometimes like other parts of what had been part of the overall AI domain in the past fall short (See the book Artificial Intelligence: A Modern Approach). Just by looking at the table of contents you can see many more AI topics which are critical but do not get a lot of attention atm. For example planning & reasoning over the insight you have gained – by e.g. using neural networks – is essential to build “semi-cognitive” autonomous systems. Btw I believe planning (the what/how) is as important as figure out the scheduling (when/where) – for example AlphaGo Zero also uses a planning component (using Monte Carlo tree search) for figuring out the next move – next to a neural network.
To have an excuse to learn Rust and to get more into planning & reasoning algorithms I started developing this library (Warning: this is still a work in progress). The experience with Rust and its ecosystem have been great so far. The Ownership concept takes some time to get used to, and probably only makes total sense after a while. A lot of the other concepts can also be found in other languages, so that makes starting easy.
The following example shows the D* Lite algorithm in action. Assume you have a maze like the one shown in the following figure and the goal is to move a robot from the coordinates (5, 0) to (0, 5). To make things more complicated, we assume a path along the corners of the maze is more “expensive” – so at the start the path a robot could take looks like this:
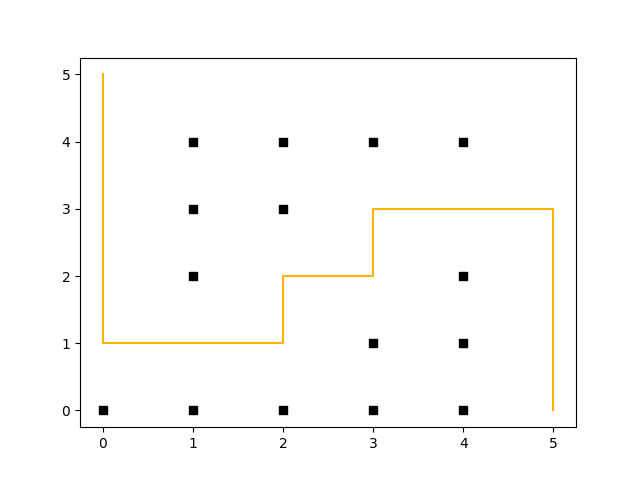
(Click to enlarge)
In contrast to A*, D* Lite uses a backward search and enables re-planning – that means that after e.g. the robot has moved two steps (to coordinate (5, 2)), and an obstacle gets removed (coordinate (3, 4) no longer represents a wall) it can re-plan without the need to recalculate all values (saving compute time). This can be seen in the following diagram (both diagrams have been plotted through rustplotlib by using Matplotlib in the background, btw. – this shows how easy it is to integrate Python with Rust.):
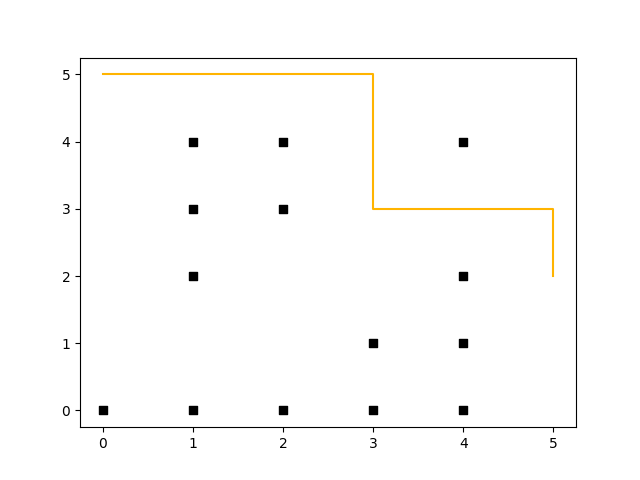
(Click to enlarge)
Why Rust? Over the years I learned some programing languages, some probably gone extinct by now. This includes candidates such as Oberon, Turbo Pascal (anyone remember Turbo Vision?), Elan, and Basic. I used to code in Java & C/C++ for a while – today it is more Python and a little bit of Go. It has been nagging me for a while, that I wanted to learn a language that was somehow “revolutionary” and offered sth new. For example Java is a great language & has a powerful SDK; Python is easy to use; etc. But Rust finally offered something new – the concepts around its memory management (w/o the need for garbage collection) & the way that it enforces you to write clean code are compelling (Maybe we can finally battle cargo cult programming). I have looked into Erlang too btw, but the syntax is just a bit too quirky – however the OTP is a very strong concept and sometimes it feels like that Cloud Native Applications + Kubernetes want to be the future OTP 🙂 Microsoft btw also describes some of their motivations to use Rust here.
So Rust is perfect? Probably not (yet) – many tools/libraries in the ecosystem are still young (e.g. grcov works only with nightly toolchain), and do not offer the same range of capabilities as e.g. in the Python world (still looking for good machine learning library etc. for example). Getting to know Rust is a bit painful in the beginning – and one word of advice: do not always follow the tips from the compiler, which it spews out on errors – sit back, think about what the errors actually means and fix it accordingly.
Any Book suggestions? So for learning Rust I mostly went with the “official” Rust book and got an older hardcopy of the book (the last programming books I bought before this was on Erlang years ago btw.). I heard the O’Reilly book on Rust is great too btw.
Categories: Personal • Tags: Algorithm, Artificial Intelligence, Autonomic System, Rust • Permalink for this article
January 4th, 2020 • Comments Off on AI reasoning & planning
With the rise of faster compute hardware and acceleration technologies that drove Deep Learning, it is arguable that the AI winters are over. However Artificial Intelligence (AI) is not all about Neural Networks and Deep Learning in my opinion. Even by just looking at the table of contents of the book “AI – A modern approach” by Russel & Norvig it can easily be seen, that the learning part is only one piece of the puzzle. The topic of reasoning and planning is equally – if not even more – important.
Arguably if you have learned a lot of cool stuff you still need to be able to reason over that gained knowledge to actually benefit from the learned insights. This is especially true, when you want to build autonomic systems. Luckily a lot of progress has been made on the topic of automated planning & reasoning, although they do not necessarily get the same attention as all the neural networks and Deep Learning in general.
To build an autonomous systems it is key to use these kind of techniques which allow for the system to adapt to changes in the context (temporal or spatial changes). I did work a lot on scheduling algorithms in the past to achieve autonomous orchestration, but now believe that planning is an equally important piece. While scheduling tells you where/when to do stuff, planning tells you what/how to do it. The optimal combination of scheduling and planning is hence key for future control planes.
To make this more concrete I spend some time implementing planning algorithms to test concepts. Picture the following, let’s say you have two robot arms. And you just give the control system the goal to move a package from A to B you want the system to itself figure out how to move the arms, to pick the package up & move it from A to B. The following diagram shows this:
 (Click to enlarge & animate)
The goal of moving the package from A to B is converted into a plan by looking at the state of the packages which is given by it’s coordinates. By picking up the package and moving it around the state of the package hence changes. The movement of the robot arms is constraint, while the smallest part of the robot arm can move by 1 degree during each time step the bigger parts of the arm can move by 2 & 5 degrees respectively.
Based on this, a state graph can be generated. Where the nodes of the graph define the state of the package (it’s position) and the edges actions that can be performed to alter those states (e.g. move a part of an robot arm, pick & drop package etc.). Obviously not all actions would lead to an optimal solution so the weights on the edges also define how useful this action can be. On top of that, an heuristic can be used that allows the planning algorithm to find it’s goal faster. To figure out the steps needed to move the package from A to B, we need to search this state graph and the “lowest cost” path between start state (package is at location A) and end state (package is at location B) defines the plan (or the steps on what/how to achieve the goal). For the example above, I used D* Lite.
Now that a plan (or series of step) is known we can use traditional scheduling techniques to figure out in which order to perform these. Also note the handover of the package between the robots to move it from A to B this shows – especially in distributed systems – that coordination is key. More on that will follow in a next blog-post.
Categories: Personal • Tags: Algorithm, Artificial Intelligence, Autonomic System, Distributed Systems, Machine Learning, Planning • Permalink for this article
Page 1 of 3612345...102030...»Last »