November 12th, 2017 • Comments Off on Controlling a Mesos Framework
Note: This is purely for fun, and only representing early results.
It is possible to combine more traditional scheduling and resource managers like OpenLava with DCOS like Mesos [1]. The basic implementation which glues OpenLava and Mesos together is very simple: as long as jobs are in the queue(s) of the HPC/HTC scheduler it will try to consume offers presented by Mesos to run these jobs on. There is a minor issue with that however: the framework is very greedy, and will consume a lot of offers from Mesos (So be aware to set quotas etc.).
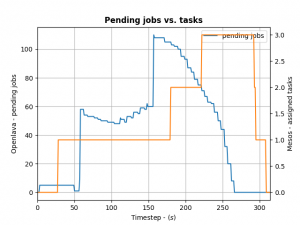
To control how many offers/tasks the Framework needs to dispatch the jobs in the queue of the HPC/HTC scheduler we can use a simple PID controller. By applying a bit of control we can tame the framework as the following the diagram shows:
(Click to enlarge)
We define the ratio between running and pending jobs as a possible target or the controller (Accounting for a division by zero). Given this, we can set the PID controller to try to keep the system at the ratio of e.g. 0.3 as a target (semi-randomly picked).
For example: if 10 jobs are running, while 100 are in the queue pending, the ratio will be 0.1 and we need to take more resource offers from Mesos. More offers, means more resources available for the jobs in the queues – so the number of running jobs will increase. Let’s assume a stable number of jobs in the queue, so e.g. the system will now be running 30 jobs and 100 jobs are in the queue. This represent the steady state and the system is happy. If the number of jobs in the queues decreases the system will need less resources to process them. For example 30 jobs are running, while 50 are pending gives us a ratio of 0.6. As this is a higher ratio than the specified target, the system will decrease the number of tasks needed from Mesos.
This approach is very agnostic to job execution times too. Long running jobs will lead to more jobs in the queue (as they are blocking resources) and hence decreasing the ratio, leading to the framework picking up more offers. Short running jobs will lead to the number of pending jobs decreasing faster and hence a higher ratio, which in turn will lead to the framework disregarding resources offered to it.
And all the magic is happening very few lines of code running in a thread:
def run(self):
    while not self.done:
        error = self.target - self.current  # target = 0.3, self.current == ratio from last step
        goal = self.pid_ctrl.step(error)  # call the PID controller
        self.current, pending = self.scheduler.get_current()  # get current ratio from the scheduler
        self.scheduler.goal = max(0, int(goal))  # set the new goal of # of needed tasks.
        time.sleep(1)
The PID controller itself is super basic:
class PIDController(object):
    """
    Simple PID controller.
    """

    def __init__(self, prop_gain, int_gain, dev_gain, delta_t=1):
        # P/I/D gains
        self.prop_gain = prop_gain
        self.int_gain = int_gain
        self.dev_gain = dev_gain

        self.delta_t = delta_t

        self.i = 0
        self.d = 0
        self.prev = 0

    def step(self, error):
        """
        Do some work & progress.
        """
        self.i += self.delta_t * error
        self.d = (error - self.prev) / self.delta_t
        self.prev = error

        tmp = \
            self.prop_gain * error + \
            self.int_gain * self.i + \
            self.dev_gain * self.d
        return tmp
I can recommend the following book on control theory btw: Feedback Control for Computer Systems.
Categories: Personal • Tags: Control Theory, LSF, Orchestration, Scheduling • Permalink for this article
January 7th, 2017 • Comments Off on Example 2: Intelligent Orchestration & Scheduling with OpenLava
This is the second post in a series (the first post can be found here) about how to insert smarts into a resource manager. So let’s look how a job scheduler or distributed resource management system (DRMS) — in a HPC use case — with OpenLava can be used. For the rationale behind all this check the background section of the last post.
The basic principle about this particular example is simple: each host in a cluster will report a “rank”; the rank will be used to make a decision on where to place a job. The rank could be defined as: a rank is high when the sub-systems of the hosts are heavily used; and the rank is low when none or some sub-system are utilized. How the individual sub-systems usage influences the rank value, is something that can be machine learned.
Let’s assume the OpenLava managed cluster is up and running and a couple of hosts are available. The concept of elims can be used to get the job done. The first step is, to teach the system what the rank is. This is done in the lsf.shared configuration file. The rank is defined to be a numeric value which will be updated every 10 seconds (while not increasing):
Begin Resource
RESOURCENAME  TYPE    INTERVAL INCREASING  DESCRIPTION
   ...
   rank       Numeric 10       N           (A rank for this host.)
End Resource
Next OpenLava needs to know for which hosts this rank should be determined. This is done through a concept of ‘resource mapping’ in the lsf.cluster.* configuration file. For now the rank should be used for all hosts by default:
Begin ResourceMap
RESOURCENAME LOCATION
rank ([default])
End ResourceMap
Next an external load information manager (LIM) script which will report the rank to OpenLava needs to be written. OpenLava expects that the script writes to stdout with the following format: <number of resources to report on> <first resource name> <first resource value> <second resource name> <second resource value> … . So in this case it should spit out ‘1 rank 42.0‘ every 10 seconds. The following python script will do just this – place this script in the file elim in $LSF_SERVERDIR:
#!/usr/bin/python2.7 -u

import time

INTERVAL = 10


def _calc_rank():
    # TODO calc value here...
    return {'rank': value}

while True:
    RES = _calc_rank()
    TMP = [k + ' ' + str(v) for k, v in RES.items()]
    print(\"%s %s\" % (len(RES), ' '.join(TMP)))
    time.sleep(INTERVAL)
Now a special job queue in the lsb.queues configuration file can be used which makes use of the rank. See the RES_REQ parameter in which it is defined that the candidate hosts for a job request are ordered by the rank:
Begin Queue
QUEUE_NAME = special
DESCRIPTION = Special queue using the rank coming from the elim.
RES_REQ = order[rank]
End Queue
Submitting a job to this queue is as easy as: bsub -q special sleep 1000. Or the rank can be passed along as a resource requirements on job submission (for any other queue): bsub -R “order[-rank]” -q special sleep 1000. By adding the ‘-‘ it is said that the submitter request the candidate hosts to be sorted for hosts with a high rank first.
Let’s assume a couple of hosts are up & running and they have different ranks (see the last column):
openlava@242e2f1f935a:/tmp$ lsload -l
HOST_NAME               status  r15s   r1m  r15m   ut    pg    io  ls    it   tmp   swp   mem   rank
45cf955541cf                ok   0.2   0.2   0.3   2%   0.0     0   0 2e+08  159G   16G   11G    9.0
b7245f8e6d0d                ok   0.2   0.2   0.3   2%   0.0     0   0 2e+08  159G   16G   11G    8.0
242e2f1f935a                ok   0.2   0.2   0.3   3%   0.0     0   0 2e+08  159G   16G   11G   98.0
When checking the earlier submitted job, the execution host (EXEC_HOST) is indeed the hosts with the lowest rank as expected:
openlava@242e2f1f935a:/tmp$ bjobs
JOBID   USER    STAT  QUEUE      FROM_HOST   EXEC_HOST   JOB_NAME   SUBMIT_TIME
101     openlav RUN   special    242e2f1f935 b7245f8e6d0 sleep 1000 Jan  7 10:06
The rank can also be seen in web interface like the one available for the OpenLava Mesos framework. What was described in this post is obviously just an example – other methods to integrate your smarts into the OpenLava resource manager can be realized as well.
Categories: Personal • Tags: LSF, Orchestration, Scheduling, SDI • Permalink for this article
June 11th, 2010 • Comments Off on Running BES++ with Platform LSF
Prerequisite is an installed LSF cluster and a gsoap 2.7.10 installation (make sure that it is exact this version – newer version won’t work). Now check-out the BES++ sources:
svn co https://bespp.svn.sourceforge.net/svnroot/bespp bespp
Now edit the Make.config file and adjust the path to your gsoap installation. The attribute is called GSOAP_TOP and can be found in the first lines of the file. You might need to adjust the LSF_LOC and LSF_ARCH attribute as well – based on the system you use. Now simple run make and the two executable besclient and besserver will be created.
While you might up ending using SSL you need to create a simple CA (or go to http://cacert.org):
mkdir cert
/usr/lib/ssl/misc/CA.pl -newca # will initialize the CA
[...]
/usr/lib/ssl/misc/CA.pl -newreq # will create a cert request
/usr/lib/ssl/misc/CA.pl -sign # sign the request
cat newcert.pem newkey.pem > server.pem# create server pem
mkdir server/ && mv new* server/ # cleanup a bit
ln -s server.pem `openssl x509 -noout -hash -in server.pem`.0
./besserver -u <username> -h localhost -p 8443 -s <path>/cert/server.pem -c <path>/cert/ -g <username> -r lsf # run the besserver
Now to submit a simple job/activity with the besclient:
/usr/lib/ssl/misc/CA.pl -newreq # will create a cert request
/usr/lib/ssl/misc/CA.pl -sign # sign the request
cat newcert.pem newkey.pem > user.pem
mkdir user1 && mv new* user1/
besclient -x user.pem -e endpoint.xml create sleep.jsdl # runs the client
The enpoint.xml files looks like:
<?xml version="1.0"  encoding="UTF-8"?>
<wsa:EndpointReference xmlns:wsa="http://www.w3.org/2005/08/addressing">
    <wsa:Address>https://localhost:8443</wsa:Address>
</wsa:EndpointReference>
The sample sleep.jsdl file looks like:
<?xml version="1.0" encoding="UTF-8"?>
<JobDefinition xmlns="http://schemas.ggf.org/jsdl/2005/11/jsdl">
    <JobDescription>
        <JobIdentification>
            <JobName>Sleep</JobName>
        </JobIdentification>
        <Application>
            <HPCProfileApplication xmlns="http://schemas.ggf.org/jsdl/2006/07/jsdl-hpcpa">
                <Executable>sleep</Executable>
                <Argument>60</Argument>
                <Output>/dev/null</Output>
                <WorkingDirectory>/tmp</WorkingDirectory>
            </HPCProfileApplication>
        </Application>
        <Resources>
            <TotalCPUCount>
                <Exact>1</Exact>
            </TotalCPUCount>
        </Resources>
    </JobDescription>
</JobDefinition>
Note: it might be necessary to add your CA to the /usr/lib/ssl/ directory as symbolic link…
Categories: Personal, Work • Tags: LSF • Permalink for this article
June 7th, 2010 • Comments Off on Install and Autoconfigure a Opensolaris zone with ZFS dedup
This is a simple script which will setup a OpenSolaris zone. After installing it is automatically configured using the sysidcfg file After running this script you will be logged in automatically. I use this script (slightly modified) to setup a complete test Platform LSF cluster…
It features the following setup:
- Support for ZFS deduplication so you can clone this machine and save disk space
- Support for DHCP so you can properly configure your network on your router
- Creates initial root password (You could add NIS or similar support as well)
#!/usr/bin/bash
zfs create rpool/export/zones
zfs set mountpoint=/zones rpool/export/zones
zfs set dedup=on rpool/export/zones

mkdir /zones/lsf_zone
chmod 700 /zones/lsf_zone

zonecfg -z lsf_zone "create; set zonepath=/zones/lsf_zone; set autoboot=false; add net; set address=192.168.0.160/24
; set defrouter=192.168.0.1; set physical=iwh0; end; verify; commit"

zoneadm -z lsf_zone verify
zoneadm -z lsf_zone install

zoneadm -z lsf_zone ready
touch /zones/lsf_zone/root/etc/sysidcfg

echo "name_service=NONE
system_locale=C
timeserver=localhost
timezone=CET
terminal=xterm
security_policy=NONE
nfs4_domain=dynamic
network_interface=primary {dhcp protocol_ipv6=no}" &> /zones/lsf_zone/root/etc/sysidcfg

zoneadm -z lsf_zone boot
Categories: Work • Tags: LSF, OpenSolaris, ZFS • Permalink for this article
